
Seeing a chipped corner or a split edge on your favorite piece of furniture can be frustrating. But don’t despair! You can absolutely repair broken corners and damaged edges yourself with a bit of patience and the right materials. This guide will walk you through assessing the damage, choosing the correct repair method – from quick fixes for minor chips to rebuilding substantial breaks – and finishing the job so it looks seamless. Restoring your furniture is often more cost-effective and sustainable than replacing it.
Why Bother Repairing Furniture Edges and Corners?
Before jumping into the ‘how,’ let’s explore the ‘why.’ Repairing damaged furniture corners and edges isn’t just about improving appearance—it’s a cost-effective alternative to replacing quality wood furniture. It’s also an eco-friendly choice, preventing unnecessary waste and keeping cherished pieces out of landfills. Plus, repairs help maintain structural integrity and preserve sentimental value. Whether it’s a beloved table, dresser, or chair, restoring it can make a significant difference. Our professional furniture repair services ensure long-lasting results.
Gather Your Supplies and Assess the Damage
Success starts with preparation. Before you begin, gather the necessary furniture repair tools and materials. You’ll likely need:
- Cleaning: Mild soap, water, clean rags.
- Assessment: Good lighting, maybe a magnifying glass.
- Repair: Wood glue, wood filler (stainable/paintable), two-part epoxy putty, putty knife/spatula, clamps (various sizes).
- Finishing: Sandpaper (medium, fine, extra-fine grits), tack cloth, matching furniture touch-up markers/pens or wood stain, clear topcoat polyurethane, lacquer, or varnish, small brushes.
- Safety: Gloves, safety glasses, possibly a dust mask (especially for sanding).
Clean the damaged area thoroughly to remove dirt and grease. Carefully examine the corner or edge. Is it a minor surface chip, a deeper gouge, a split along the grain, or is a piece completely broken off? Understanding the severity helps you choose the right repair method. Always work in a well-ventilated area, especially when using epoxy or finishes.
Minor Chips and Scratches: Quick Fixes
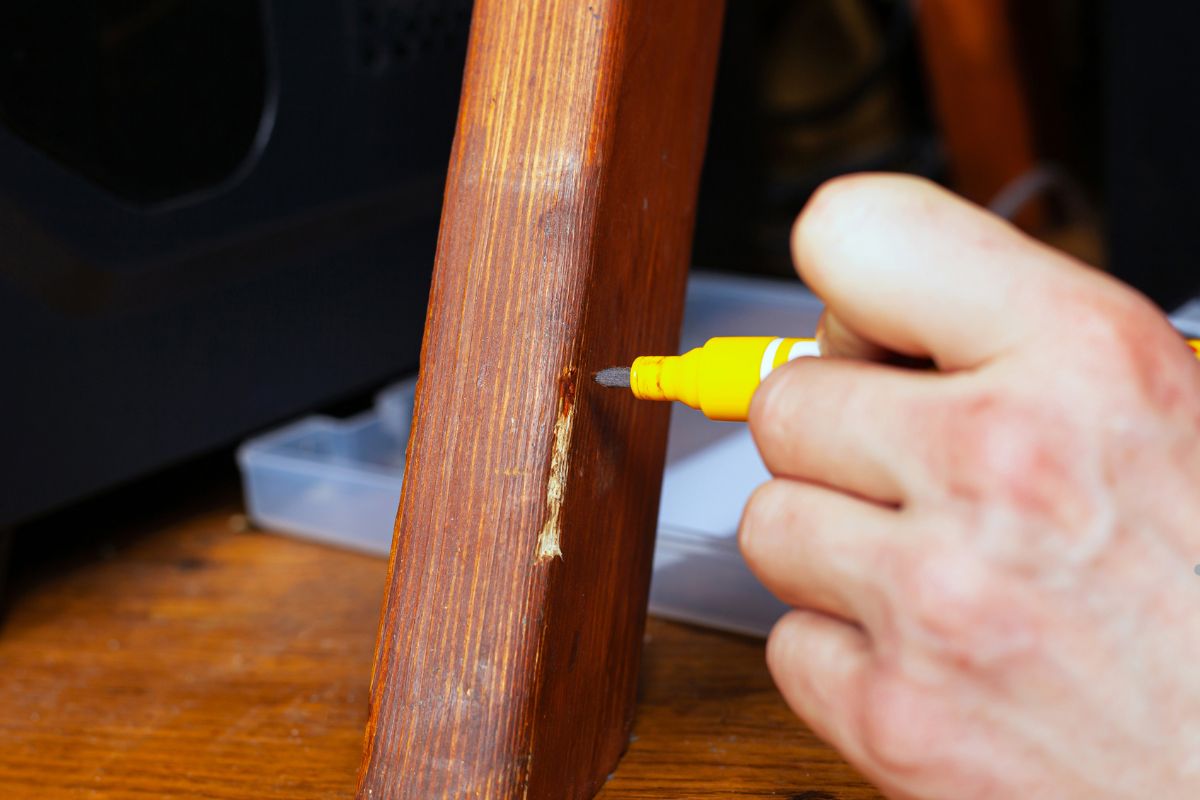
For superficial damage like small chips or surface scratches that haven’t significantly altered the shape of the corner or edge, quick cosmetic fixes are often sufficient. Furniture repair markers, crayons, or hard wax sticks specifically designed for wood can work wonders.
- Clean: Ensure the area is clean and dry.
- Apply: Choose a marker, crayon, or wax stick that closely matches your furniture’s finish. Fill the scratch or chip by rubbing the product gently over the defect. Markers color it in, while crayons and wax physically fill the void.
- Blend: Gently buff the area with a soft, clean cloth to blend the repair and remove any excess product. These methods are great for minor wood repair and quick touch-ups to improve appearance instantly.
Filling Small Gaps and Gouges: Using Wood Filler
When you have small missing chunks, deeper gouges, or noticeable dents on corners and edges, wood filler (or wood putty) is your go-to solution. Choose a filler that’s either stainable or paintable, depending on your furniture’s finish.
- Apply: Using a putty knife, press the wood filler firmly into the damaged area. Slightly overfill the gap, as filler tends to shrink a little as it dries.
- Dry: Allow the filler to dry completely according to the manufacturer’s instructions. Drying time varies based on the product and depth of the fill.
- Sand: Once fully cured, sand the filled area smooth using medium-grit sandpaper, followed by fine-grit. Aim to make the repair perfectly flush with the surrounding wood surface. Use a sanding block for flat edges to maintain sharpness.
- Clean: Wipe away all sanding dust with a tack cloth.
Rebuilding Broken Corners: Epoxy Putty or Wood
For significant damage, such as a completely broken-off corner or a large missing chunk, a durable solution like two-part epoxy putty for wood or a carefully shaped replacement piece may be necessary. Call us today for expert repair solutions!
- Using Epoxy Putty:
- Mix: Knead together equal parts of the two epoxy components until a uniform color is achieved (follow product instructions). Work relatively quickly as epoxy has a limited working time.
- Apply & Shape: Press the mixed epoxy firmly onto the damaged corner, rebuilding its shape. Mold it carefully to match the original profile. You can often smooth it with a wet putty knife or gloved finger.
- Cure: Allow the epoxy to cure completely (this can take several hours – check instructions). It will become rock hard.
- Sand & Refine: Once cured, sand the epoxy repair smooth, starting with medium-grit and progressing to fine-grit sandpaper, carefully blending it into the surrounding wood.
- Using a Wood Piece (for larger breaks):
- Shape: Cut and shape a small piece of similar wood to roughly fit the missing section.
- Glue & Clamp: Apply wood glue to both the furniture and the wood patch. Press the piece firmly into place and clamp securely until the glue dries completely.
- Refine: Once the glue is dry, use wood filler to fill any small gaps around the patch. Sand the entire area smooth to blend the patch seamlessly.
Rebuilding furniture corners requires patience but yields durable results.
Fixing Split Edges: Glue and Clamping
If the wood along an edge has split but is still mostly intact, wood glue and clamps are usually the answer.
- Clean: Gently clean inside the split if possible, removing any loose debris.
- Apply Glue: Carefully work a good quality wood glue deep into the crack or split. Use a thin nozzle applicator or a small brush if needed. Don’t be shy with the glue, but avoid excessive squeeze-out.
- Clamp: Immediately clamp the split edge tightly together. Use pads (like small wood scraps) under the clamp jaws to prevent marring the furniture surface. Ensure the clamp pressure is even along the split.
- Wipe Excess: Wipe away any glue that squeezes out immediately with a damp cloth. Dried glue is much harder to remove and can interfere with finishing.
- Dry: Leave the clamps in place for the duration recommended by the glue manufacturer (often several hours or overnight).
This method is effective for repairing cracked furniture edges and restoring structural integrity.
Making it Match: Sanding, Staining, and Sealing
The key to an invisible repair lies in the finishing touches. After filling, rebuilding, or gluing, the repaired area needs to blend seamlessly with the rest of the furniture.
- Final Sanding: Ensure the repaired area is perfectly smooth and flush with the surrounding surface using fine or extra-fine grit sandpaper. Feather the edges slightly to help blend the transition. Wipe clean with a tack cloth.
- Color Matching: This is crucial.
- Stained Wood: Select a wood stain that closely matches the original color. Always test the stain on a hidden area or a scrap piece of similar wood first. Apply the stain carefully to the repaired area using a small brush or rag, feathering the edges. You might need multiple thin coats to achieve the right depth of color.
- Painted Wood: Use matching furniture paint. Again, test first. Apply thin coats for a smooth finish.
- Sealing: Once the stain or paint is completely dry, apply a clear protective topcoat like polyurethane, varnish, or lacquer that matches the original finish sheen (e.g., matte, satin, gloss). Apply it over the repaired area and slightly onto the surrounding original finish to seal the repair and provide durability. Apply thin coats as per the product instructions.
Preventing Future Corner and Edge Damage
An ounce of prevention is worth a pound of cure (or repair!). Protect your furniture corners and edges from future mishaps with these simple tips:
- Moving Furniture: Lift, don’t drag. Use furniture sliders or pads under legs when rearranging.
- Vacuuming: Be mindful of bumping vacuum cleaner heads against furniture legs and bases.
- Surface Protection: Use coasters, placemats, and trivets to protect tabletops from moisture and heat.
- High-Traffic Areas: Consider adding subtle, clear corner protectors or guards to furniture in high-traffic zones, especially if you have young children or pets.
- Regular Care: Keep furniture clean and occasionally apply appropriate polish or wax, which can offer a minor layer of protection.
When to Call a Furniture Repair Professional
While many corner and edge repairs are DIY-friendly, sometimes it’s best to call in the experts. Consider professional furniture repair services if:
- The Damage is Severe: Large missing sections, complex breaks, or structural instability might require specialized tools and expertise.
- It’s a Valuable Antique: Don’t risk devaluing an antique with an improper repair. Professionals understand period-appropriate techniques and materials.
- The Finish is Complex: Matching intricate finishes, veneers, or lacquers can be extremely difficult without professional experience and color-matching tools.
- You Lack Time or Confidence: IIf the project feels overwhelming or you’re short on time, a professional furniture restoration service can deliver high-quality results with ease. From minor touch-ups to full restorations, our team has you covered. Call us today for expert assistance!
Frequently Asked Questions (FAQs)
What’s the best filler for furniture corners?
For minor chips and gouges, a good quality stainable/paintable wood filler is often sufficient. For rebuilding broken corners or larger missing pieces, a two-part epoxy putty designed for wood provides superior strength and adhesion.
How do I match the wood color after repair?
Test stains or paints on an inconspicuous area first. Start with a slightly lighter shade, as you can always apply more coats to darken it. Use furniture touch-up markers for minor scratches. Blending carefully is key. For difficult matches, professional color matching might be needed.
Can I repair laminate furniture edges this way?
Some techniques, like using color-matched repair markers or specific laminate repair kits (often wax or putty based), can work for minor chips on laminate. Wood glue can sometimes reattach peeling laminate edging. However, wood filler and epoxy designed for solid wood may not bond well or look right on laminate surfaces. (Check specific [Anchor Text: laminate repair product instructions] for suitability – External Link Example)
How long does wood filler or epoxy take to dry/cure?
Drying and curing times depend on the product and environmental factors like temperature and humidity. Standard wood fillers may be sandable within an hour or two for shallow repairs, but deeper fills can take up to 24 hours. Epoxy putty typically requires several hours to harden fully before sanding. Always check the manufacturer’s instructions for the best results. Need expert furniture repair? Contact us today!